Goals

2020 Goals

I have set some pretty big goals for this year. Most of them center around our home and family, but I do have one for my creative pursuits. This year, I want to create with purpose. I want the items I make to have some meaning for the recipient. Sometimes that purpose might be as simple as filling a void in their wardrobe, like the leggings I’m planning to make for Peanut to wear under her school uniform on chilly days. Other times that purpose might be to challenge myself to growing my skill set, or even just to make someone smile.

For the last 6 months, I have been using an Erin Condren Deluxe Monthly planner to plan out my creative time. This has helped me stay organized and actually get projects completed rather than just dream about doing them. There are several projects this coming year that I will need to plan out ahead of time if I’m going to actually complete them. One example of that is the 52 Week Sewing Challenge. This will be the third year I have attempted the challenge, but I have yet to make it past the first quarter.  Hopefully with better planning and routines in place, I will finish the challenge this year.

Do you set creative goals for yourself? How do you keep yourself accountable?


**This post may contain affiliate links. If you choose to make a purchase after following an affiliate link, I will receive a small commission at NO COST to you. Thank you!**

Holiday Sewing

Holiday Sewing

DSC_0011

Our holidays are usually pretty relaxed. We share Thanksgiving with some wonderful friends and Christmas is usually spent at home with just the five of us. This year, I chose this Luna Skirt and Knot Your Average Top pairing for my outfit. Both patterns are staples from 5 out of 4 Patterns. The crushed velour I used for the skirt is so soft and has the perfect drape for a circle skirt.

DSC_0051

I used cotton/lycra for the top, to make it very versatile. It can be paired with jeans or khakis for a casual, everyday look as well as the crushed velour skirt for dressier occasions.

DSC_0097

I crocheted the shawl last year using Lion Brand Shawl in a Ball. I wasn’t planning on finishing off this outfit with it while I was sewing, but it added just the right pop of color that I had to use it.


**This post contains affiliate links. If you choose to make a purchase after following an affiliate link, I will receive a small commission at NO COST to you. Thank you!**

Holiday Sewing · Sew For Boys

It’s The Most Wonderful Time of the Year

For the last few years, our favorite photographer (Life As Art Photography) has offered mini holiday sessions. Almost all of my favorite photos of the kids have been taken by Life As Art, so we make sure to book a session each year. The sessions are usually held a week or two after Halloween, while I’m attempting to recover from my Halloween sewing. (You can read about this year’s costumes in Part I, Part II, and Part III .) I usually manage to have a few mama-made clothes in the holiday photos, but haven’t ever managed to get everyone in mama-made before this year.

A few weeks ago I made this Hayden Henley for Mark, and I knew the Bug needed a matching one. I love how it turned out! You can find the kid’s pattern here.

2E5A9711

The girls are in matching Sally Skirts. The knot detail in the waistband is everything!

2E5A97622E5A9753

I had intended to sew up a Knot shirt and a Luna skirt for myself, but I didn’t quite get to it. I finally decided to wear this Sydney I made during testing last winter. This is one of my favorite dresses!

2E5A9892

Mark wore his Hayden Henley to round out the mama-made.

2E5A9915

We usually use a few photos from these sessions for our Christmas cards, but we haven’t gotten around to making them yet this year. If we do, this photo will probably be featured pretty prominently. I can see each of the kids’ personalities shining through.2E5A9834

And as much as I love the photos where most of us are standing nicely and smiling, I also love the ones that remind me how the session really felt at the time. This one sums up this year’s session pretty well.

2E5A9796


Home Dec · Sew For Boys

Tooth Fairy Pillow

Losing a first tooth is a right of passage in childhood. The Bug lost his first tooth shortly after turning 4 years old. Not quite expecting it to happen so early, I had to scramble to get him a pillow to use for the tooth fairy. I used a pin for an Etsy listing of a tooth fairy pillow as inspiration and whipped up this pirate tooth for him.

20160427_195534

Peanut was almost as excited as the Bug for his pirate pillow and immediately started talking about what she wanted her tooth fairy pillow to look like. She started getting a little antsy as her 5th birthday came and went without so much as a wiggle. Every few weeks she would try desperately to find a wiggly tooth and tell me about the tooth fairy pillow she wanted. She had a nice long wait. She lost her first tooth a week after her 6th birthday, and even with almost 3 and a half years to prepare I still had to scramble to finish her pillow.

DSC_0006

For Peanut’s pillow, I followed a tutorial I found on Pinterest by Color the Moon. Unfortunately, when I follow the link now, it only leads to a photo of a few adorable pillows.

Now Bear is starting her pillow requests. Her teeth came in on a similar schedule to the Bug’s, so I better get cracking on a pink princess pillow soon. If she loses teeth on the same schedule as the Bug, she’ll start losing teeth in about a year.

How does the tooth fairy treat your kids? With the Bug being the first kid in our sphere to lose a tooth, it was up to us to set the bar. We set it pretty low, with the tooth fairy leaving a single golden dollar coin in exchange for a healthy clean tooth.

Pattern Reviews · Uncategorized

The Tech Organizer – Around the Bobbin

Every now and then I decide to sew up something that’s not clothing. Around the Bobbin patterns are always a good bet. It’s nice to be able to create something both beautiful and functional that won’t be outgrown by my rapidly growing kids. My most recent Around the Bobbin make was the super handy Tech Organizer.

DSC_0016

The Tech Organizer has 2 zipper pockets, 4 internal pockets, and 2 external pockets giving it plenty of space for all of the bits and bobs that go along with your electronics.

DSC_0008

DSC_0020DSC_0002

Included with the pattern is a helpful little cord keeper to keep your cords from getting tangled up inside the bag. The magnetic closure makes it easy to wrap those cords up nice and neat.

DSC_0031

This bag has proven to be very useful in containing all of the tech paraphernalia that comes along with life today. I’m sure it will be getting a lot of use in the future.

Pattern Reviews · Sew For Boys

Halftime Hoodie – 5 out of 4 Patterns

I have a confession to make.


I don’t always follow the instructions when I’m sewing.


In fact, the only time I really do more than a cursory glance at the instructions is when I’m pattern testing and have promised to follow the instructions exactly as written.


Earlier this week, I shared a guest post over on the 5 out of 4 Patterns blog as part of their Sewing Through The Seasons series. I wrote about how I manage to eke out time to sew in my current season of life.  You can read that post here. One thing I left out was my tendency to rearrange the steps in a pattern to make more efficient use of my time. This is particularly helpful on days when I’m only managing to grab 5 minute increments of time in my sewing room.

I always scan through a tutorial quickly before starting, looking for important info like seam and hem allowances. I also look carefully at the instructions for pattern options that I don’t use as frequently, like the thumbhole cuffs I used on this Halftime Hoodie I made for the Bug.

DSC_0033

One of the major reasons it saves me time to rearrange the pattern instructions is because I have a combination serger/coverstitch machine. I tend to get as much construction done as possible before switching over to the coverstitch function, and then getting as much of the topstitching and hemming finished before switching back to finish up any construction steps that might be left.

During this project, I completed the shoulder seams, side seams, arm seams, and hood construction first. Then I switched to the coverstitch function of my machine to topstitch the shoulder seams and hood. When I switched back to the serger function I attached the sleeves, the hood, the cuffs (constructed on my sewing machine), and hem band.

DSC_0012

I know that the steps in a tutorial are given in a specific order for a reason. In the case of hems, it certainly gives a cleaner finish to hem after all other construction is finished. In this particular season of my life, since I am only sewing for personal use, it is more important to me to be efficient than to be 100% correct.

DSC_0022

After all, no one is going to be inspecting and critiquing my garment construction. These kids of mine are just happy that I can make them clothes they love that fit comfortably.

DSC_0016

The Halftime Hoodie is on sale for $5 through Sunday, November 17, 2019. Head over to 5 out of 4 Patterns and grab your copy before the sale is over!


**This post contains affiliate links. If you choose to purchase a pattern after following those links, I will receive a small commission at NO COST to you. Thank You!**

Halloween Sewing

Halloween 2019 – Part III

Every year on Halloween we host a hayride that drives the kids and their friends around trick or treating. The kids all have a blast. Last year Baby Bear was all set to ride along for the first time. I made her the cutest little dinosaur costume based off of a matching tail and frill headband I found in the Dollar Spot at Target. I used the Mega Max Raglan by Max & Meena Patterns and the pants from the Versatility set by 5 out of 4 Patterns. I’m glad I used such comfy patterns, because a few days before Halloween she came down with pneumonia. She was feeling much better by Halloween night so I let her dress up for an hour or so, but she missed out on the hayride.

45008087_10160878757965398_8959787566026981376_n

Baby Bear has three main obsessions, her bike, dinosaurs, and puppies. When I asked her what she wanted to be for Halloween this year, she emphatically told me she wanted to be a “black, girl puppy”. She was insistent that the puppy costume be a girl, and that it be all black.

DSC_0044

This was the simplest costume I made this year, but it’s just perfect for Bear. It’s possible that she spends more time pretending to be a puppy than admitting to being human. She absolutely adores it and has stayed true to her puppy character every time she has put it on.

DSC_0048

I broke out the trusty Mega Max Raglan again for this puppy, with one modification. I used the Mega Max to make a CatBoy costume for the Bug a few years ago and his biggest complaint was how the tail, attached to the hem band, kept getting in his way. It would get twisted up with his legs as he moved. This year, instead of attaching the puppy tail in the manner given in the tutorial, I encased some elastic in black cotton/lycra and attached the tail. The tail is now basically a belt that can be easily removed.

DSC_0032

For the bottom half of this puppy, I used the Rachel Knit pants by 5 out of 4 Patterns. I love how the optional double ruffle at the ankle covers her shoes. Baby Bear pretends the ruffles are tufts of fur around her leg.

DSC_0076

Baby Bear was so excited to finally be able to join her siblings on the Halloween hayride this year. All three kids were super excited to wear their costumes. That excitement is what makes the stress of making Halloween costumes worth it in the end. I feel pretty great when I am able to turn one of their visions into reality. Hitting the mark with all three is just amazing.

I hope you enjoyed my little trips down memory lane as I told you about this year’s costumes. I can’t wait to see what challenges they throw at me next year!


**This post contains affiliate links. If you choose to purchase something after clicking on these links, I will receive a small commission at NO COST to you. Thank you!**

Halloween Sewing

Halloween 2019 – Part II

For a few years, the kids were excited about coordinating costumes. It’s always fun to come up with a theme and have their costumes individually be part of a whole. How cute are these two as Alpha Pig and Princess Pea from the show Super Why?DSC_0058

Or the next year, as pirates?

DSC_0027

As the kids have gotten older, their interests have diverged a bit. I think the days of coordinating costumes may be behind us.

This year, Peanut dressed up as her favorite pop star, Jojo Siwa. She specifically asked for the outfit Jojo wears in her video for the song “Boomerang”. DSC_0007

When I first took a good look at the outfit requested, I thought it was the perfect opportunity to give myself a break and use some ready made components to the costume. I searched high and low for a pink denim vest that I could embellish with some bows. When I couldn’t find anything in Peanut’s size, I searched for a white vest that I could dye pink. Nothing. I ended up not having any option but to sew the vest myself. I used Jalie 2320 and modified it to be sleeveless. I also substituted bows for buttons and left the buttonholes closed.

FB_IMG_1572876128056

The tank underneath is a Taylor Tank by 5 out of 4 Patterns. I’ve sewn a few of these recently, and it is quickly becoming a favorite pattern. It’s just so simple and cute.

The skirt is Peanut’s favorite Little Luna skirt mashed with the Little Ninja Leggings in the 3″ length. Both of these are free patterns from 5 out of 4 Patterns, and Peanut loves the twirl of the skirt combined with the comfort of the shorties.

I was able to finish both the tank and the skirt in the same day, which helped to make up for the week that I spent on the vest. Peanut loves this look, and I’m sure each of these pieces will get regular use in her normal wardrobe. That’s a double win.

Do your costume sews ever double as regular wardrobe pieces?

Stay tuned for Baby Bear’s turn in my costume round up!


**This post contains affiliate links. If you choose to purchase a pattern after following one of these links, I will receive a small commission at NO COST to you. Thank you!!**

Halloween Sewing · Sew For Boys

Halloween 2019 – Part I

The sewing world seems to be pretty split on the topic of Halloween costumes, at least among those that participate in the holiday. I can see why. For the last several years (8 to be exact), October has been an incredibly stressful month for me. I am one of those that insists on making Halloween costumes, no matter how stressful it can be. And though I really wouldn’t have it any other way, I have developed some strategies to mitigate some of the craziness.

One of the most important is that I give the kids a deadline to pick their costume. Whatever they want to be on September 1st is what I am making. There’s no changing their minds. That gives me time to choose and order patterns and materials before I get down to the business of sewing in October. I have to say, those decisions were a lot easier when the kids were younger and didn’t express as many opinions.

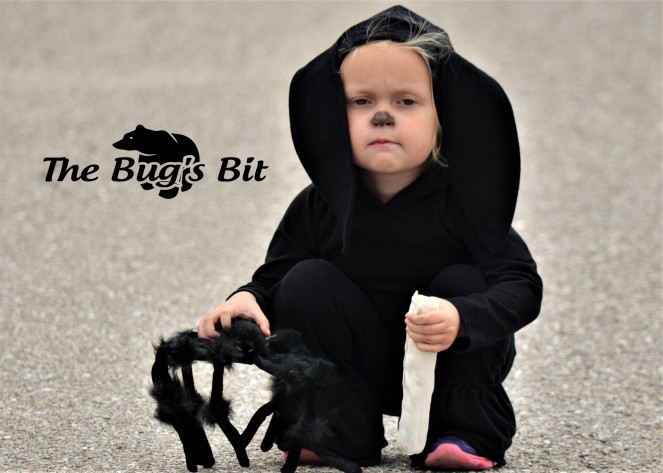
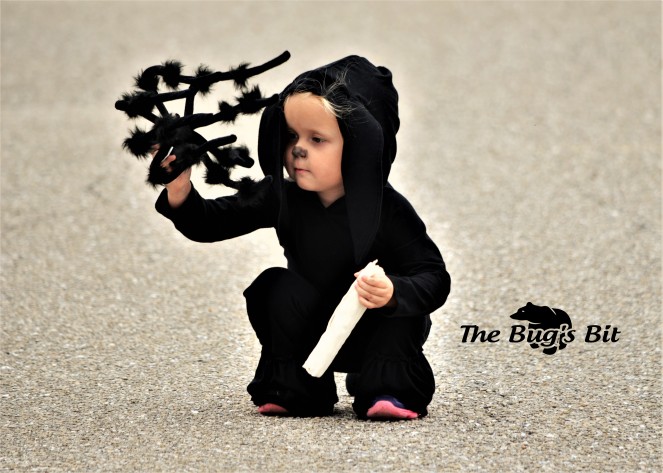
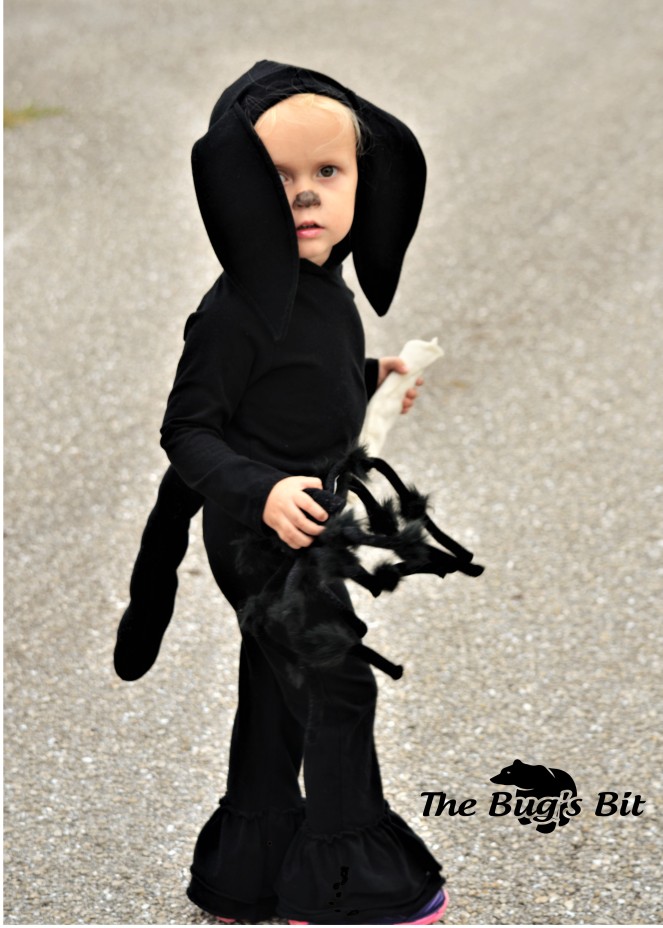
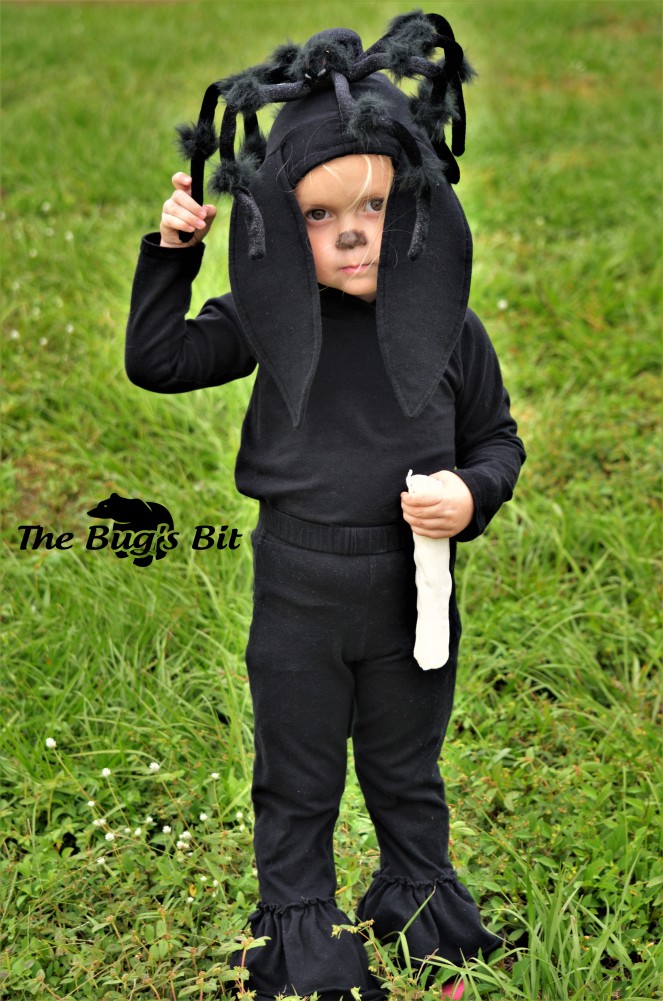
Another strategy I use is that not every piece of every costume has to be made from scratch. I give myself the grace to use some ready to wear components. This spider costume from the Bug’s first Halloween is a great example. I used ready to wear tights for the legs, sewed them on the back of a ready to wear t shirt, and paired it with ready to wear black joggers. I used black fabric paint to create a web design on the white t shirt.DSC_0017

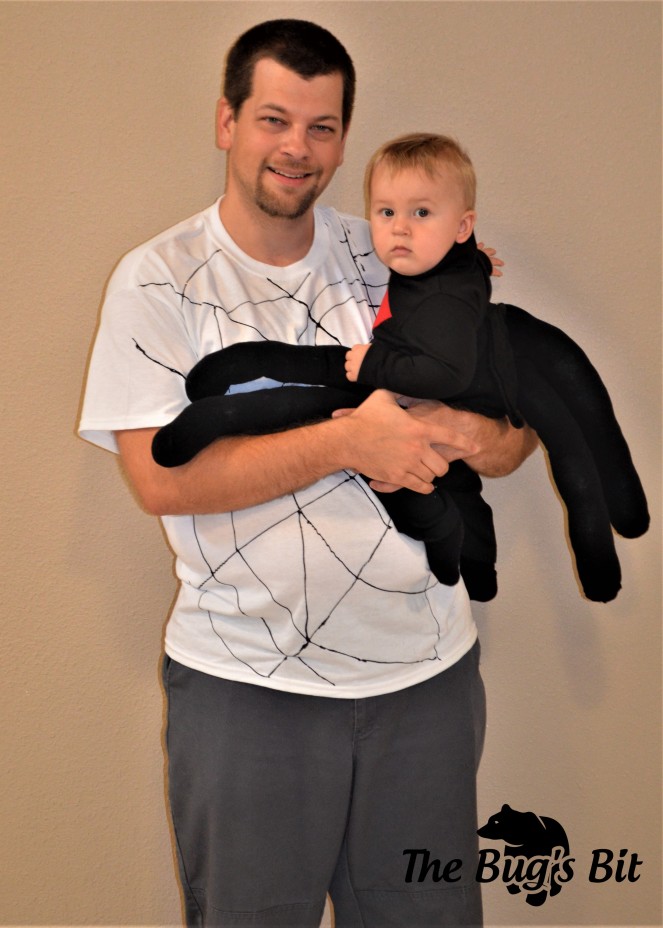
It totally got the job done.

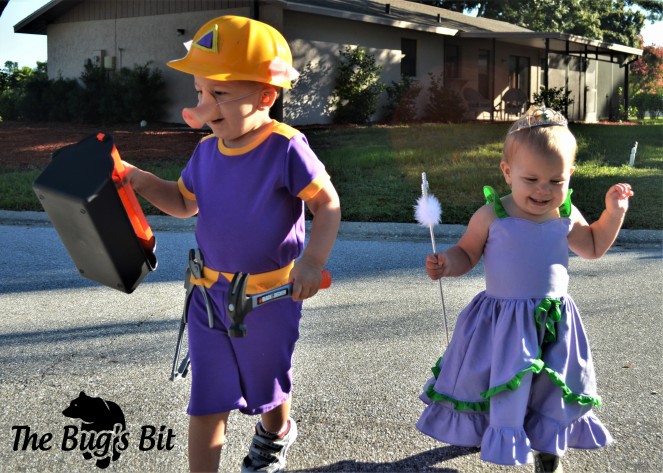
I didn’t sew anything for The Bug’s second Halloween and it ended up being one of my favorite costumes I have ever done.Collage 2019-11-05 22_27_02

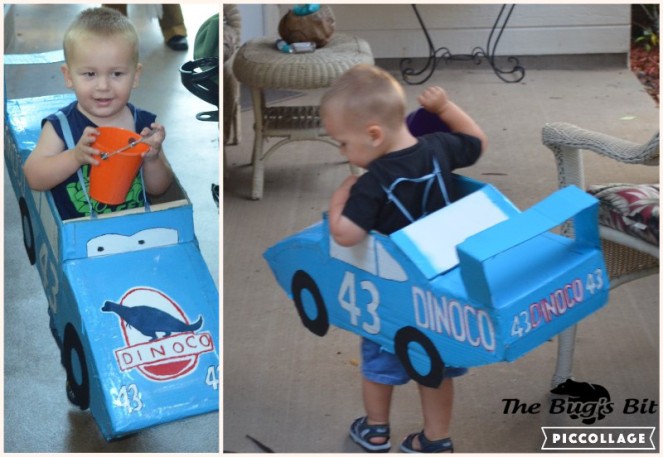
The 2 year old Bug loved the movie Cars. He dragged this costume around the house for months, until the cardboard just fell apart.

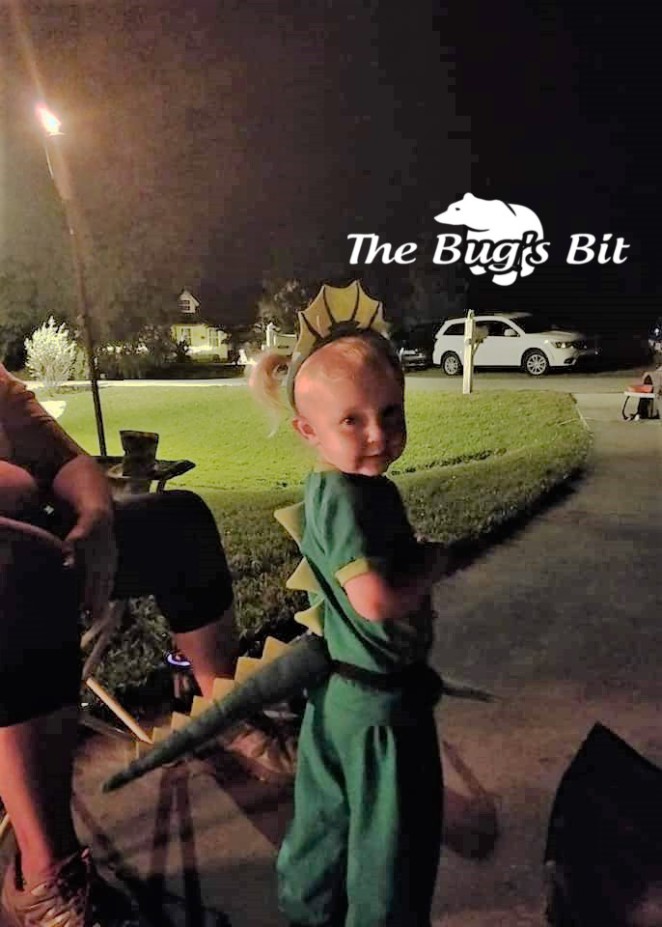
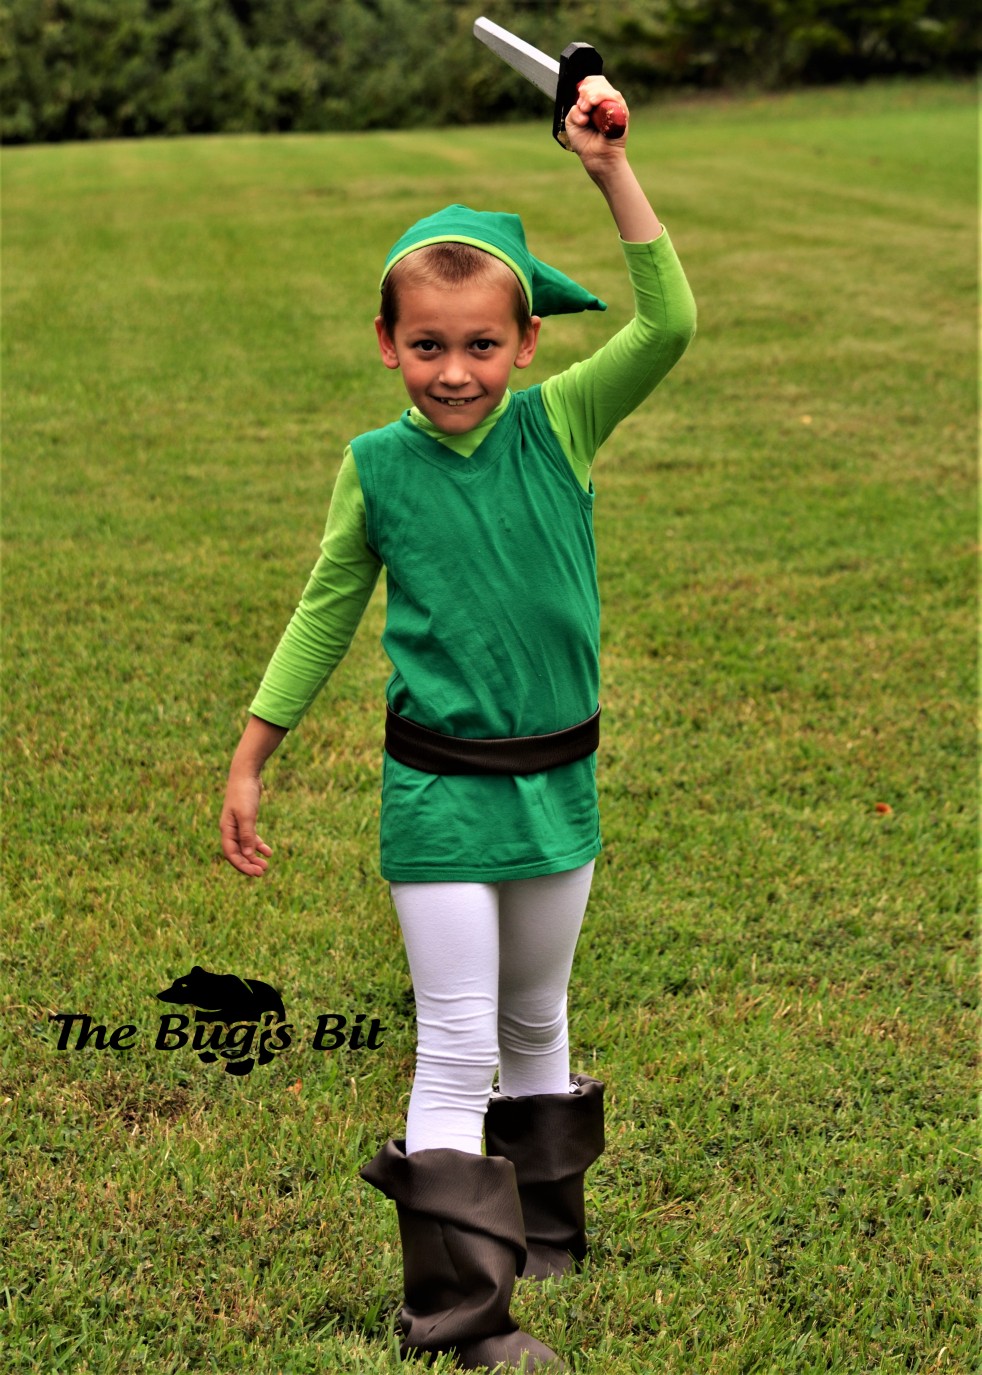
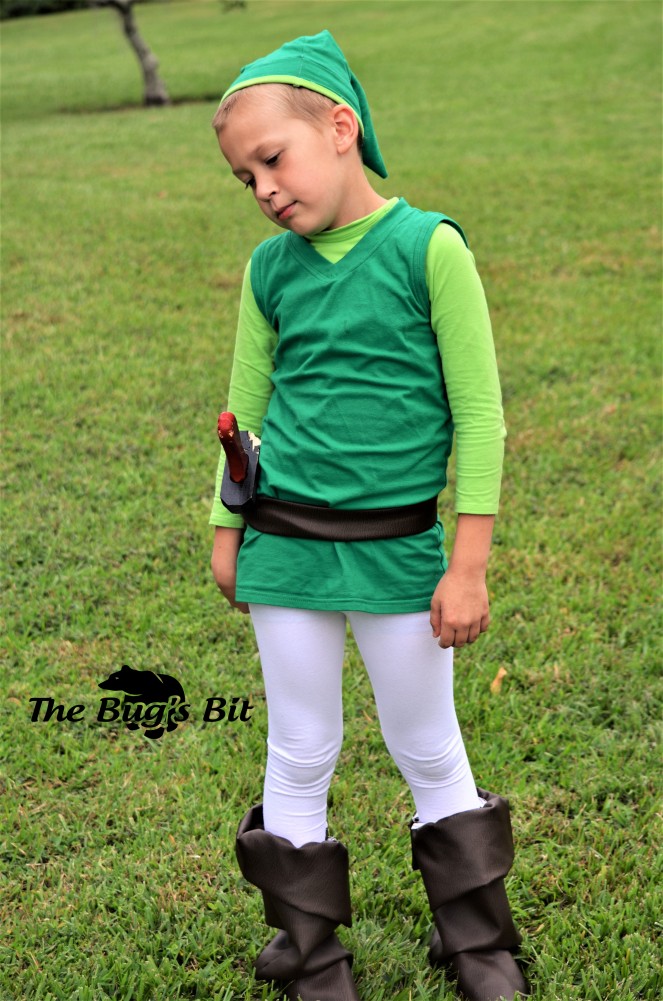
I suspect that his costume this year will also be worn to shreds. When he asked to be Link, from The Legend of Zelda, for Halloween this year I knew that I was going to be able to make that happen for him. He is over the moon with how it turned out.

DSC_0115

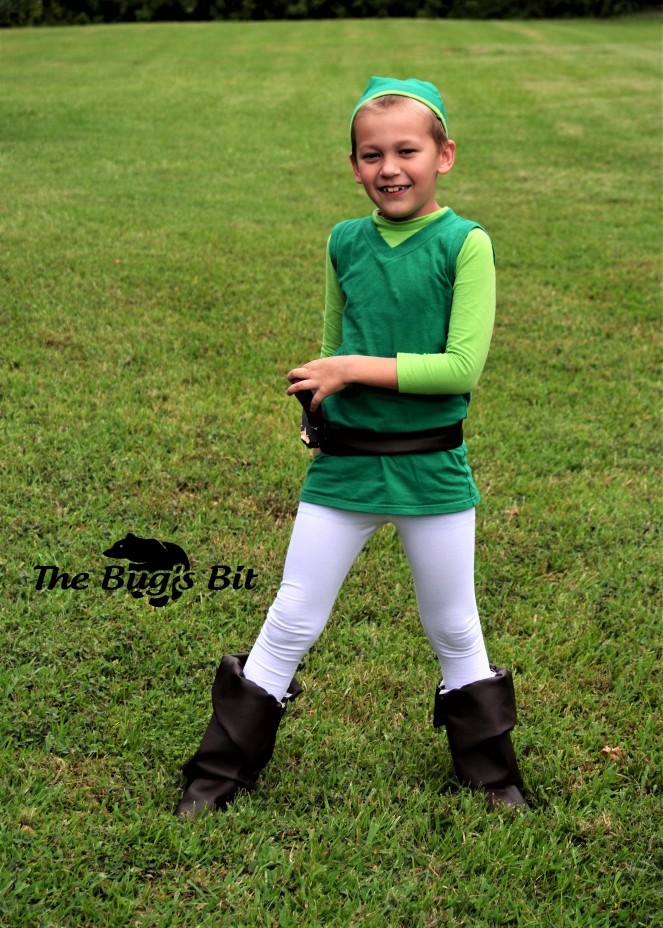
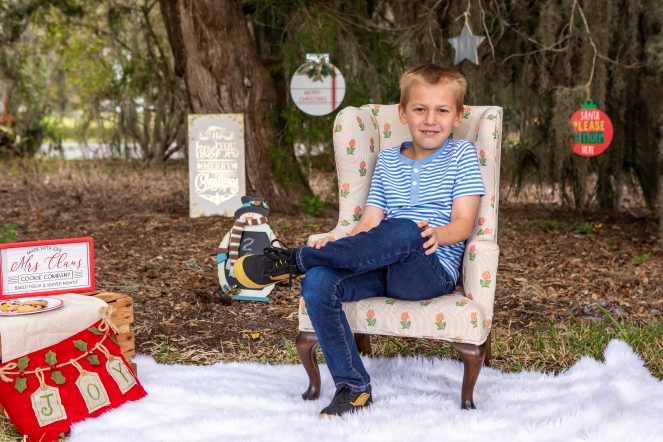
I was able to sew everything he needed for this costume. I used the Hang Ten Rashguard by Peek-a-boo Pattern Shop for the undershirt. I also used the Little Ninja Leggings and the Easy Tee patterns by 5 out of 4 Patterns for the leggings and the tunic. The hat was made loosely using this tutorial from Twilight Princess and substituting cotton/lycra for the felt. The cotton/lycra for all pieces came from PurpleSeamstress Fabrics.

DSC_0097

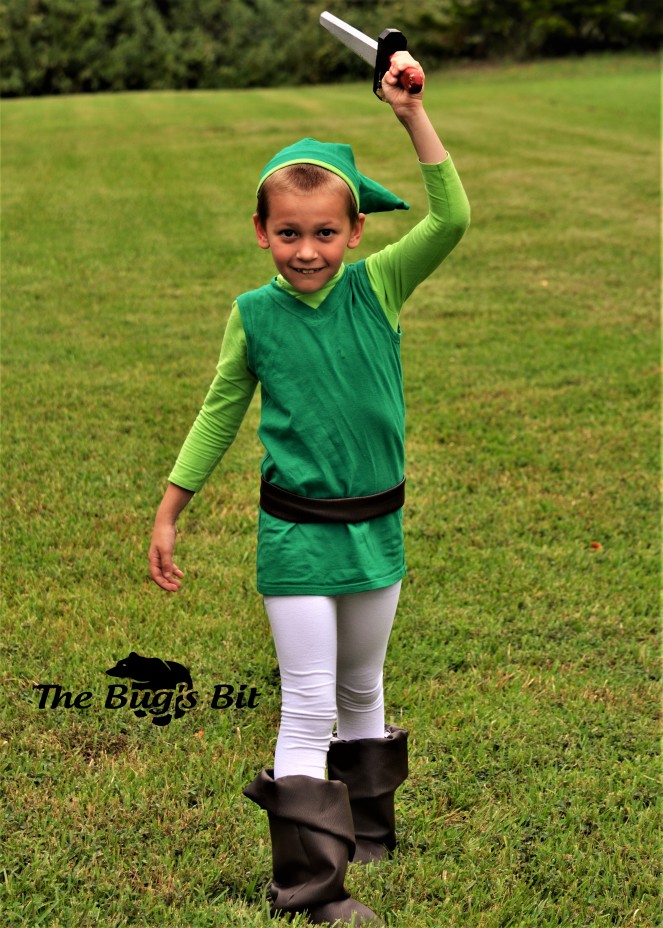
The boots were adapted from the Child’s Pirate Boots tutorial by In The Little Stone Cape. The pattern in the tutorial is for a child’s size ten, which was much too small. I ended up printing at 130% and then winging it from there, using vinyl. My efforts to enlarge the pattern resulted in boots that sagged and flapped around his feet, and I ended up sewing an elastic strap under the foot and another elastic strip around the bottom of the cuff on Halloween morning to help them fit a little better. They made it through the night, but I suspect that the Bug will skip them and just use his imagination while wearing this costume in the future. I used the same vinyl from the boots for the belt. I sewed it into a tube, turned and topstitched it closed before using brown snaps to strap it around his waist.

DSC_0140

All in all, I’m pretty pleased with the results. It was definitely worth it to be able to create a costume he loves that actually fits. And it wasn’t too difficult to put together. Stay tuned for Part II, to see how Peanut’s costume turned out.

Do you sew Halloween costumes?


**This post contains affiliate links. If you choose to purchase a pattern after clicking on these links, I will receive a small commission at NO COST to you. Thank You!**

Pattern Reviews

Willow Vest – 5 out of 4 Patterns

As I was perusing the options at my local Joann Fabrics the other day, I came across this pale pink super plush. I knew right away it needed to be a snuggly vest for Peanut to wear this fall. This fabric is so soft, I just want to pet it.

DSC_0018

The Willow Vest pattern by 5 out of 4 Patterns is the perfect layering piece for cool weather. Peanut will be able to wear this all winter long. The pattern came together very easily. I decided to go with the solid version, and used cotton/lycra for the bindings and pocket lining.

DSC_0004

The biggest challenge I had with this vest came from the fabric. In fact, the left overs have been put in time out and will remain there until I forget just how much fluff was shed in the process of using it. The little hand vacuum I keep in my sewing room could barely keep up. The fabric also had a tendency to stretch out while being cut and sewn. Poor Baby Bear is probably going to end up waiting until next year before she gets a matching vest.

DSC_0015

Because I typically sew with knits, I don’t often sew closures of any kind. The separating zipper in this vest was no trouble though, with the excellent instructions in the tutorial and copious amounts of wash away Wonder Tape. That stuff might just be one of the greatest inventions ever. It holds the zipper securely in place without the distortion that pins always give me.

DSC_0023

As awful as the fabric was to work with, I am very pleased with the final results. I may just need to go on a hunt for some fleece for a vest for the Bug.


Have you ever put a fabric or project in to Time Out? I know I can’t be the only one.


**This post contains affiliate links. If you choose to purchase a pattern from thos links, I will receive a small percentage of the purchase price at NO COST to you. Thank you!**